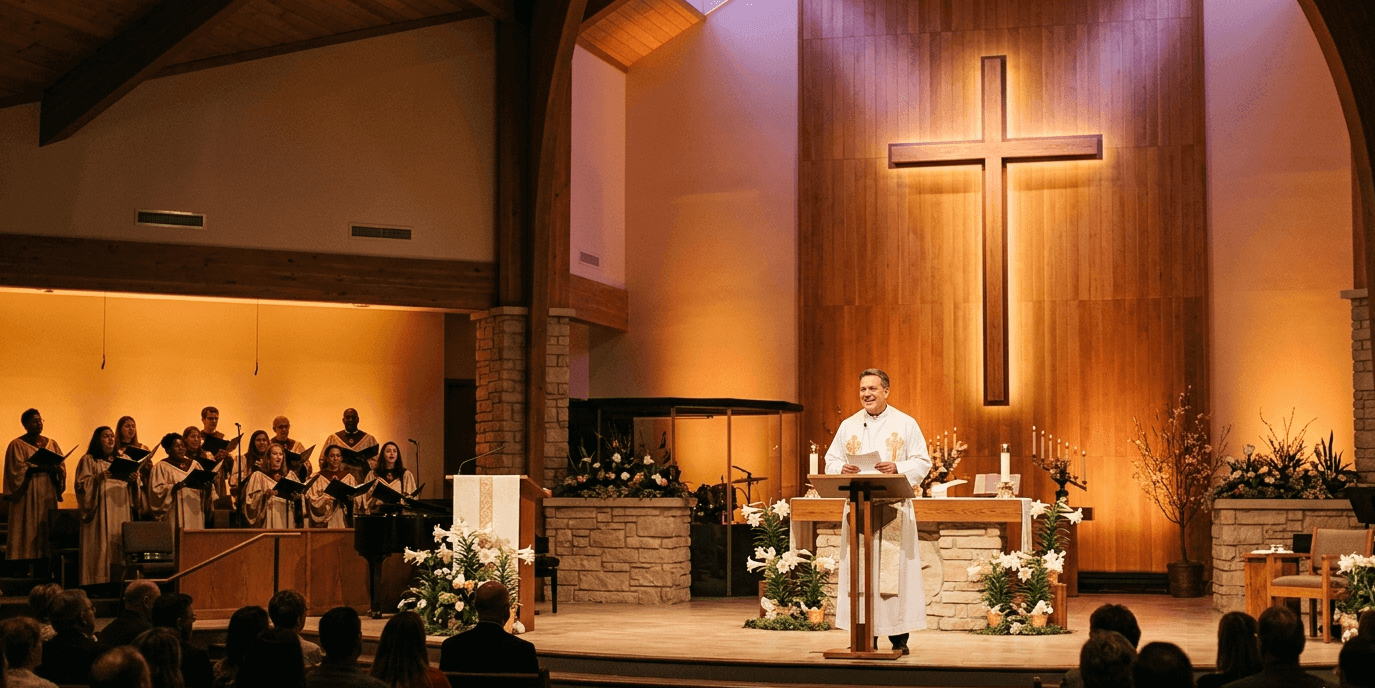

- Early morning light
- Warm sunrise tones
- Renewal and life
Cool lighting shifts the space in the opposite direction—toward something that feels more like a rehearsal room or conference setting than a moment of resurrection and hope.
1.2 Too Flat: The Directional Lighting Problem
Another common issue is front-only lighting.When all your fixtures are positioned at the front—aimed directly at the stage—you eliminate most natural shadows. This results in:
- Faces appearing washed out
- No depth between subject and background
- The cross, pulpit, and choir blending into a single visual plane
1.3 Why This Matters More at Easter
Lighting is not just about visibility—it’s about visual storytelling.Easter services often follow a narrative arc:
-
Darkness → Light
-
Stillness → Celebration
-
Death → Resurrection
If your lighting remains consistently cold and flat, you lose the ability to support that transition. The room never visually “wakes up.”Instead of a gradual emergence into warm, hopeful light, the space stays static.
1.4 Real Constraints in Small Churches
It’s important to acknowledge reality:
- You may only have a handful of LED PAR lights
- No advanced lighting console
- Limited mounting positions
- Volunteers running the system
This article is designed with exactly that situation in mind.You don’t need moving lights, expensive fixtures, or complex programming to fix these issues. What you need is a better use of color, angle, and balance—using the equipment you already have.
Core Solution #1: Warm Washes(Creating a Warm Base Layer)
If you only make one change to your Easter lighting, make it this one:
shift your entire stage from cool white to a controlled warm wash.
This single adjustment will immediately transform the space from cold and neutral to inviting, natural, and spiritually aligned with the idea of resurrection light.
2.1 Target Color Temperature: Think 2700K–3000K
For Easter services, your goal is not “bright white”—it’s warm, early-morning light.
- 2700K–3000K → soft, warm, similar to halogen or candlelight
- Feels natural on skin tones
- Matches the visual language of sunrise and renewal
Anything above 4000K will start to feel too neutral or cool for this context.If your fixtures allow color temperature control, simply dial them into this range.
If not, you can still achieve a similar result manually.
2.2 Creating Warm Light with Basic LED PAR Fixtures
Most small churches use RGB or RGBW LED PAR lights, which don’t have a dedicated “Kelvin” control. Instead, you’ll mix colors.A reliable starting point:
- Red: 100%
- Green: 35–50%
- Blue: 0–10%
This creates a warm white with a slight amber tone, without pushing too far into yellow.
⚠️ Avoid this common mistake:
- Setting Red 100% + Green 100% + Blue 0% → overly yellow, unnatural skin tones
Instead, keep green controlled and add just a touch of blue if needed to balance.
2.3 Using CTO to Warm Up Cool Fixtures
If your lights are stuck in cool white (very common), the simplest fix is adding a
Color Temperature Orange (CTO).CTO filters physically warm the light output without needing programming.
1. Full CTO
- Converts daylight (~5600K) to tungsten (~3200K)
- Strong warming effect
2. Half CTO
- More subtle
- Ideal for front lighting where skin tone matters
For most Easter setups:
- Use Half CTO on front lights (natural faces)
- Use Full CTO on background or general wash if needed
2.4 Keep the Entire Stage Consistent
One of the biggest issues in small setups is mixed color temperatures.Example of what to avoid:
- Warm front light
- Cold white background
This creates a visual disconnect where subjects look separate from the space.Instead:
- Make sure your wash, background, and key areas all lean warm
- If you keep any cool tones, they should be intentional (we’ll cover this later)
2.5 Practical Setup (Quick Win)
With just 4–6 PAR lights, you can already improve dramatically:
- 2–4 fixtures → front wash (warm)
- 2 fixtures → background wash (also warm, slightly dimmer)
No advanced programming needed—just:
- Set color
- Balance brightness
- Keep it consistent
A well-balanced warm wash becomes your foundation layer.
Once this is in place, everything else—faces, symbols, and space—will immediately feel more alive.
Core Solution #2: Side Fill(Adding Depth with Directional Light)
Once your warm wash is in place, the next step is what truly separates a “basic setup” from a professional-looking stage:👉 adding side fill lightingThis is the key to solving the second major problem we identified earlier—flat, lifeless lighting.
3.1 Why Side Light Changes Everything
Front lighting alone makes everything visible—but it also removes dimension.When light only comes from the front:
- Faces look flat
- No shadow = no depth
- Subjects blend into the background
By introducing light from the sides, you reintroduce gentle shadows that:
- Define facial structure
- Add contrast and separation
- Make people and objects feel “present” in the space
Even with the same fixtures, this one change can make your stage look dramatically more polished.
3.2 Where to Place Side Fill Lights
You don’t need special rigging to do this—just smart positioning.Basic placement:
- 1 light on the left side
- 1 light on the right side
Height options:
- Ideally: around head height to slightly above
- If no stands: place on the floor angled upward
Angle:
- Aim at the subject from roughly 30°–60° off center
- Avoid straight-on (that becomes front light again)
Think of it as lighting the subject from the edges, not the front.
3.3 Color & Intensity Settings
Side fill should support your warm wash—not compete with it.
- Use the same warm color range (2700K–3000K feel)
- Set brightness to about 60–80% of your front light
This ensures:
- Shadows are visible, but not harsh
- Faces stay natural and readable
⚠️ Avoid:
Strong side light at 100% → creates dramatic, theatrical shadows (not ideal for church settings)
3.4 Simple Setup for Small Churches
If you only have a few fixtures, here’s a practical way to prioritize:
- 2 lights → front warm wash
- 2 lights → side fill (one per side)
That’s enough to completely transform depth.No light stands? No problem:
- Place fixtures on chairs, pew edges, or the floor
- Tilt upward toward the speaker or choir
Even low-budget positioning works—as long as the direction changes.
3.5 What to Expect Visually
After adding side fill, you should notice:
- Faces gain soft contour and realism
- The speaker separates clearly from the background
- The cross or stage elements feel more dimensional
- The entire scene looks more “intentional,” not accidental
This is especially important for:
- Preaching moments
- Choir performances
- Close-up camera shots
Core Solution #3: Using CTO Effectively(Controlling Warmth with Precision)
Once you’ve established a warm wash and added side fill, the final step is refining your color temperature so it feels intentional—not accidental.This is where CTO (Color Temperature Orange) becomes extremely useful.
4.1 What CTO Does (and Why It Matters)
Color Temperature Orange (CTO) is a color correction filter used to convert cool white light into warmer tones.Instead of relying only on RGB mixing (which can sometimes look uneven or overly saturated), CTO allows you to:
- Achieve natural, consistent warmth
- Improve skin tone accuracy
- Maintain brightness without strange color shifts
For Easter, this helps create a lighting environment that feels closer to real sunrise light, rather than artificial color.
4.2 Choosing the Right CTO Strength
Not all CTO is the same. The strength you choose determines how warm your light becomes.Full CTO
- Strong conversion (≈5600K → 3200K)
- Best for very cool fixtures that need a major correction
- Can feel too orange if overused on faces
1. Half CTO
- Moderate warming
- Ideal for front/key lighting
- Keeps skin tones natural while removing the cold look
2. Quarter CTO
- Subtle correction
- Useful when your light is already slightly warm
- Great for camera-friendly setups
👉 Practical rule:
- Front lights → Half CTO
- Background / fill → Full or Half CTO depending on need
4.3 Creating an “Easter Sunrise” Look
Easter lighting is not just warm—it’s symbolic. You’re visually representing:
- Dawn
- Renewal
- Resurrection
To achieve this, you can go beyond plain CTO and introduce subtle color layering.Technique 1:
- CTO + Soft Rose Tint
- Add a very light pink/rose gel on one or two fixtures
- Blend with CTO-warmed light
- Result: gentle “sunrise glow” instead of flat amber
Technique 2: CTO + Light Amber
- Slight amber boost (very low intensity)
- Enhances warmth without turning yellow
⚠️ Keep it subtle:
These effects should be felt, not noticed
If the audience can clearly “see the color,” it’s too much
4.4 How to Apply CTO in a Small Church Setup
You don’t need special gear—just simple, practical methods:
- Clip gels directly in front of PAR lights
- Use gel frames if available
- Even basic clips or holders will work
Focus on:
- Front lights first (biggest visual impact)
- Then adjust side fill if needed
If you don’t have gels:
- Simulate CTO using RGB mixing (as covered earlier)
- But prioritize consistency across all fixtures
Practical Lighting Setups (3 Easy Easter Setups You Can Actually Use)
The goal here is simple:
You don’t need to “design lighting”—you just need to place a few lights correctly and keep everything warm.Each setup below is built on the same logic:
👉 Start warm → add side light → highlight one key element
Setup 1: Standard Easter Stage (Start Here)
👉 If you only do one setup, do this one.Step-by-step:
- Front Wash (2–4 lights)
- Place lights in front of the stage
- Aim slightly downward toward people
- Set to a warm tone (2700K–3000K feel or warm RGB mix)
Side Fill (1 light per side)
- Place one light on each side of the stage
- Floor placement is fine—angle upward toward people
- Set brightness lower than front lights (~70%)
Background (optional)
- Avoid cool white
- Use a soft warm tone or keep it dim
What you’ll see:
- Faces look natural instead of pale
- Soft shadows create depth
- The whole stage feels warm and unified
👉 This alone will take your lighting from “flat” to clean and intentional
Setup 2: Better Lighting for the Speaker (Great for Livestream)
👉 If you have a camera, this matters a lot.Step-by-step:
- Main Light (Key Light)
- Use one primary light for the speaker
- Position slightly off-center (not straight-on)
- Add Half CTO or warm it slightly
Fill Light (Opposite side)
- Lower intensity (50–70%)
- Same warm tone
- Keep Setup 1 running underneath
What you’ll see:
- Face has shape (not flat)
- No harsh shadows
- Skin tones look natural on camera
👉 Simple rule:
One main light + one softer fill, both warm
Setup 3: Easter Focus Moment (Cross / Candle / Symbol)
👉 Use this during key Easter moments.Step-by-step:
- Pick one focal element
- (cross, candle, altar, etc.)
Use one dedicated light
- Warm tone (slightly richer is okay)
- Angle from the side—not straight on
Lower the rest of the stage slightly(Optional) Add a very subtle cool tone in the background
- Just enough to suggest early morning
What you’ll see:
- Clear visual focus
- More emotional impact
- A strong “dark → light” feeling
What to Avoid (Quick Checklist)
Before your Easter service, take a minute to check these:
1. Too Yellow
- Faces look orange → reduce amber / green
- Use Half CTO instead of Full CTO on front lights
👉 Aim for warm, natural skin tones
2. Mixed Color Temperatures
- Warm front + cool background = looks wrong
👉 Keep your stage mostly warm and consistent
3. Wrong Camera White Balance
- Set camera to 3200K–3500K
- Avoid auto mode
👉 This keeps your warm lighting looking natural on video
4. No Contrast
- Everything warm = flat again
👉 Keep a very subtle cool tone in the background (optional)
5. Overcomplicating It
- You don’t need complex programming
👉 One good warm look is enough
Next Steps for Improvement
If you want to take your setup further, for example:
- Add a few additional fill lights
- Improve overall stage coverage
- Achieve more consistent and stable color across the space
Then the focus should be on choosing fixtures that are truly suited for real-world church and live environments. Look for lights that offer:
- Even and uniform output
- Smooth color mixing
- Reliable performance during services and events
You can explore and expand your lighting setup here: https://betopperdj.com/

Dejar un comentario
Todos los comentarios se revisan antes de su publicación.
Este sitio está protegido por hCaptcha y se aplican la Política de privacidad de hCaptcha y los Términos del servicio.